Yoga does more than improve flexibility or help you relax. It can also support your digestive system in meaningful ways. When you practice yoga regularly your body stimulates the digestive organs and reduces bloating while encouraging your gut to work properly. If you deal with digestive problems adding these eight yoga poses to your daily routine might help you feel better. The physical movements in yoga massage your internal organs and increase blood flow to your digestive tract. This helps your body process food more efficiently and can ease common problems like constipation or indigestion. The breathing techniques you use during yoga also calm your nervous system which plays an important role in digestion. Many people notice improvements in their digestive health after just a few weeks of consistent practice. The poses work by gently compressing and stretching your abdomen which encourages movement through your intestines. Some positions also help release trapped gas and reduce uncomfortable bloating. You don’t need to be an experienced yogi to benefit from these poses. Even beginners can perform most of them with simple modifications. The key is to practice regularly and pay attention to how your body responds. Start slowly and gradually increase the time you spend in each position as you become more comfortable. These eight poses specifically target digestive health & can be done in about fifteen to twenty minutes. You can practice them in the morning to wake up your digestive system or in the evening to help your body process your last meal. Listen to your body and avoid any poses that cause pain or significant discomfort.
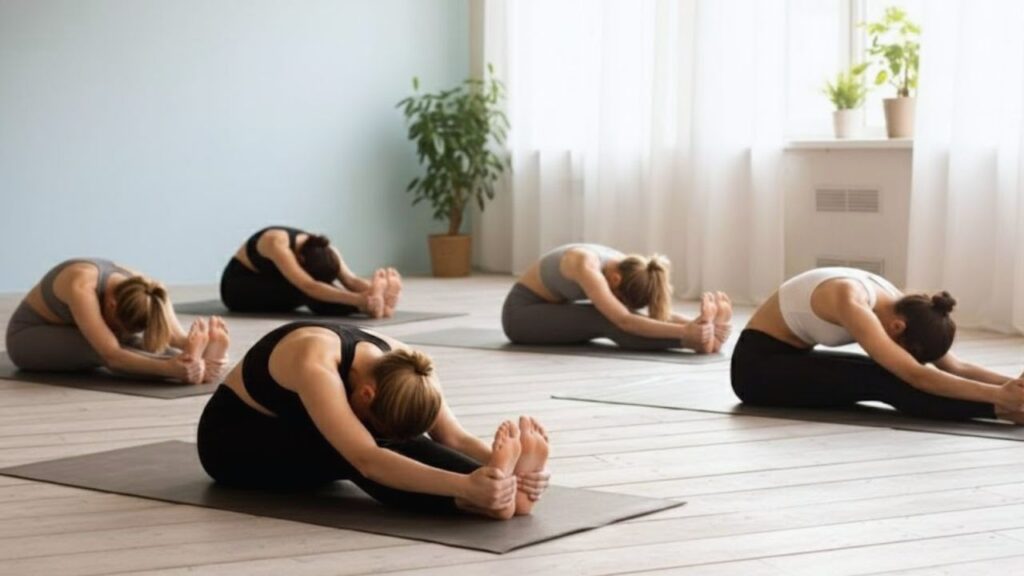
1. Seated Forward Fold (Paschimottanasana)
The Seated Forward Fold is a gentle pose that encourages the proper functioning of the digestive organs. By folding forward, you apply pressure to your abdomen, stimulating digestion and improving blood flow to your digestive tract.
- Stimulates the digestive system
- Helps alleviate constipation
- Improves flexibility in the spine and hamstrings
How to Do It
 Age Pension Rise 2026: $1,144 Annual Increase And Updated Eligibility Criteria For Australians
**Step 1: Get Your Materials Ready**
 New National Driving Regulation 1 April 2026: Motorists Face Updated Compliance Rules Nationwide
Start by gathering everything you need. Make sure you have all the tools and supplies within reach before you begin. This saves time and prevents interruptions during the process.
**Step 2: Prepare Your Workspace**
Clear a flat surface where you can work comfortably. Remove any items that might get in the way. Good lighting helps you see what you are doing and reduces mistakes.
**Step 3: Read the Instructions**
Look over any guidelines or directions that came with your materials. Understanding the steps beforehand makes the actual work go more smoothly. Take note of any warnings or special requirements.
**Step 4: Start with the Basics**
Begin with the simplest part of the task. This builds your confidence and helps you understand how everything fits together. Do not rush through this initial stage.
**Step 5: Work Steadily**
Move through each step at a consistent pace. Focus on one thing at a time rather than jumping around. This approach leads to better results and fewer errors.
**Step 6: Check Your Progress**
Pause occasionally to review what you have completed. Make sure everything looks correct before moving forward. Fixing problems early is easier than correcting them later.
**Step 7: Finish and Clean Up**
Complete the final steps carefully. Once done put away your tools and materials. Clean your workspace so it is ready for next time.
- Sit with your legs extended in front of you.
- Inhale deeply, lengthening your spine.
- Exhale as you hinge at your hips and fold forward, reaching for your feet.
- Hold for 30 seconds to one minute, breathing deeply.
2. Cat-Cow Pose (Marjaryasana-Bitilasana)
This classic pose helps improve how well your spine can move while gently massaging your digestive system. It supports better digestion by activating the organs in your abdomen and boosting blood flow throughout the area.
- Relieves tension in the back
- Increases blood flow to the digestive system
- Stimulates peristalsis
# How to Do It
**Getting Started**
Begin by standing with your feet positioned shoulder-width apart. Keep your back straight and your core muscles engaged throughout the entire movement.
**The Movement**
Lower your body by bending at your hips and knees. Push your hips back as if you’re sitting down in a chair. Continue descending until your thighs are parallel to the floor or as low as you can comfortably go while maintaining proper form.
**Key Points to Remember**
Keep your chest up and your eyes looking forward. Your knees should track over your toes without extending past them. Distribute your weight evenly across your entire foot.
**Returning to Start**
Push through your heels to stand back up. Squeeze your glutes at the top of the movement. Keep your core tight as you rise to the starting position.
**Common Mistakes to Avoid**
Don’t let your knees cave inward during the movement. Avoid rounding your back or leaning too far forward. Make sure you’re not lifting your heels off the ground.
**Breathing Technique**
Breathe in as you lower your body down. Exhale as you push back up to the starting position. Maintain steady breathing throughout each repetition.
**Progression Tips**
Start with bodyweight only until you master the form. Add weights gradually once you feel comfortable with the movement pattern. Increase the difficulty by adding resistance bands or dumbbells.
- Begin on your hands and knees in a tabletop position.
- Inhale as you arch your back, dropping your belly toward the floor (Cow Pose).
- Exhale as you round your back, bringing your chin to your chest (Cat Pose).
- Repeat for 10-15 rounds, moving with your breath.
3. Downward-Facing Dog (Adho Mukha Svanasana)
The Downward-Facing Dog stretches and strengthens your whole body while helping food move through your intestines. This pose stimulates your digestive organs and reduces bloating.
- Stimulates circulation to the abdominal area
- Relieves tension in the back and legs
- Improves overall digestion and detoxification
# How to Do It
**Getting Started**
Begin by gathering all the materials you need for the project. Make sure you have a clean workspace with good lighting. Read through all the instructions before you start so you understand each step.
 Centrelink Payment Increase 2026: Updated Pension And Benefit Rates Begin Rolling Out Nationwide
**Step One: Preparation**
Set up your work area and organize your tools. Check that everything is in working order. If you are working with any equipment that requires safety gear then put that on first.
**Step Two: Basic Assembly**
Start with the foundation or base of whatever you are building. Follow the sequence carefully and do not skip ahead. Each part needs to connect properly to the next one.
**Step Three: Main Construction**
Work through the middle sections at a steady pace. Take your time with any complicated parts. If something does not fit right then stop & figure out what went wrong before continuing.
**Step Four: Finishing Touches**
Add the final components once the main structure is complete. Double check all connections & make sure everything is secure. Clean up any excess materials.
**Step Five: Testing**
Test your finished project to confirm it works as intended. Make any needed adjustments. Keep notes about what worked well and what you might do differently next time.
**Tips for Success**
Stay patient throughout the process. Rushing leads to mistakes. Ask for help if you get stuck on something. Practice makes perfect so do not get discouraged if your first attempt is not flawless.
- Start in a tabletop position, with your wrists directly beneath your shoulders and knees beneath your hips.
- Tuck your toes and lift your hips toward the sky, forming an inverted “V.”
- Keep your hands and feet shoulder-width apart, and press your heels toward the floor.
- Hold for 30 seconds to one minute, breathing deeply.
4. Twisted Chair Pose (Parivrtta Utkatasana)
The Twisted Chair Pose is a deep twist that massages the internal organs, stimulates digestion, and aids in detoxification. This pose can help relieve bloating and improve overall gut health.
- Stimulates digestive organs
- Promotes detoxification
- Improves balance and stability
# How to Do It
**Getting Started**
Begin by gathering all the materials you need for the task. Make sure your workspace is clean and organized before you start. This preparation will help you work more efficiently and avoid mistakes.
**Step-by-Step Process**
First you need to understand what the goal is. Read through all the instructions carefully before beginning any work. This prevents confusion later on. Next set up your equipment or materials in the order you will use them. Having everything within reach saves time and keeps you focused on the task. Start with the most important steps first. These are usually the foundation of whatever you are building or creating. Take your time with these early stages because they determine how well everything else will turn out.
**During the Work**
Pay attention to details as you go along. Small mistakes early on can become big problems later. If something does not look right stop and fix it immediately rather than continuing forward. Check your progress regularly against the instructions or plan. This helps you stay on track and catch any errors before they become serious issues.
**Finishing Up**
Once you complete all the main steps review your work carefully. Look for anything you might have missed or any areas that need improvement. Clean up your workspace and put away all tools and materials properly. This makes it easier to find everything next time you need it. Test or examine the final result to make sure it meets your expectations. If something needs adjustment now is the time to make those changes.
**Final Thoughts**
Practice makes perfect with any new skill or task. Do not get discouraged if your first attempt is not perfect. Each time you repeat the process you will get better and faster at it.
- Begin by standing with your feet together.
- Bend your knees as if sitting in a chair, with your thighs parallel to the floor.
- Bring your palms together at your heart, and twist your torso to the right, hooking your left elbow outside your right knee.
- Hold for 30 seconds to one minute, and repeat on the other side.
5. Wind-Relieving Pose (Pavanmuktasana)
# Wind-Relieving Pose
The Wind-Relieving Pose works directly on your digestive system to help release trapped gas & reduce bloating. This pose offers real relief if you deal with digestive discomfort or stomach issues. The position gently compresses your abdomen & stimulates your intestines. When you hold this pose your body naturally encourages movement through your digestive tract. Many people find immediate comfort after practicing it for just a few minutes. You can do this pose whenever your stomach feels uncomfortable or tight. It works well in the morning to wake up your digestive system or in the evening after meals. The gentle pressure helps your body process food more efficiently and reduces that heavy feeling in your gut. This simple movement doesn’t require any special equipment or flexibility. Anyone can try it regardless of their fitness level. The pose gives your internal organs a helpful massage while you rest in a comfortable position on your back.
- Relieves gas and bloating
- Stimulates the digestive organs
- Enhances overall digestive health
How to Do It:
- Lie flat on your back with your legs extended.
- Inhale and bring your right knee toward your chest, clasping it with both hands.
- Hold for 30 seconds, then switch legs.
- For a deeper stretch, you can bring both knees toward your chest simultaneously.
6. Cobra Pose (Bhujangasana)
The Cobra Pose stretches your abdomen and makes your back stronger. This helps your body digest food better and keeps your gut healthy. When you do this pose your digestive organs get more blood flowing to them. This extra blood helps break down food more easily.
- Stimulates the digestive system
- Relieves lower back pain
- Improves posture and flexibility
How to Do It:
- Begin by lying face down, with your palms placed beneath your shoulders.
- Press your elbows into the floor, and as you inhale, slowly lift your chest and upper abdomen, arching your back.
- Hold for 15-30 seconds, then gently lower your chest back to the floor.
7. Child’s Pose (Balasana)
Child’s Pose is a resting position that gently stretches your back and hips while helping to calm your mind. This pose encourages relaxation in your abdominal area and can support better digestion and improved gut health.
- Calms the nervous system
- Relieves stress, which can improve digestion
- Gently stretches the abdomen and hips
How to Do It:
- Start on your hands and knees, with your knees spread wide and your big toes touching.
- Sit back onto your heels, bringing your forehead to the floor, and extend your arms forward.
- Stay in this position for 1-2 minutes, breathing deeply.
8. Bridge Pose (Setu Bandhasana)
The Bridge Pose offers a great way to stretch your chest spine and hips while also activating your abdominal organs. This position helps improve your digestion and reduces the discomfort that comes from bloating.
- Stimulates the digestive organs
- Strengthens the back and glutes
- Improves circulation to the abdomen
How to Do It:
- Lie flat on your back with your knees bent and feet flat on the floor, hip-width apart.
- Press your feet into the ground and lift your hips toward the ceiling.
- Keep your shoulders and head on the floor, and hold the pose for 30 seconds to one minute.
Conclusion
Incorporating these yoga poses into your daily routine can significantly improve digestion, reduce bloating, and promote overall gut health. Yoga not only strengthens your body but also calms your mind and alleviates stress, both of which are essential for a healthy digestive system. Make these poses a part of your wellness journey and feel the difference in your gut health.