Starting yoga without natural flexibility might feel intimidating at first. You may worry about doing poses incorrectly or falling behind others in class. But the reality is that yoga was designed for ordinary people with normal bodies. You do not need flexibility before beginning yoga. Flexibility develops through consistent practice. When you start with basic stretches meant for beginners you let your body adapt naturally without pushing too hard. With regular practice you will see genuine improvements in how your body moves during everyday activities. The key point is that yoga emphasizes gradual progress rather than immediate perfection. Every stretch & every breath contributes to better movement and overall wellbeing.
Why Gentle Yoga Is the Safest Starting Point for New Flexibility Gains
# Starting Your Flexibility Journey with Basic Yoga Stretches
Beginning with a gentle approach makes sense when you start any flexibility program. Basic yoga stretches help you focus on proper form and body awareness. This method reduces your injury risk & builds a strong foundation for future progress. Simple poses help you develop a better mind-body connection. When movements are straightforward you can notice how your body responds and understand your limits and when to ease up. This awareness builds confidence and motivates you to practice consistently. Research on exercise habits shows that people who start with manageable routines succeed more often at sticking with their program. Jumping into difficult workouts too quickly usually causes muscle soreness or fatigue or injuries. Gradual progression creates better long-term commitment and stronger results. Learning fundamental stretches first prepares your muscles and joints and nervous system for more challenging yoga poses later. This makes your practice safer and easier to sustain over time and more enjoyable overall.
 Age Pension Rise 2026: $1,144 Annual Increase And Updated Eligibility Criteria For Australians
11 Beginner-Safe Yoga Stretches That Gradually Unlock Full-Body Flexibility
# Beginner Yoga Stretches for Tight Muscles
 New National Driving Regulation 1 April 2026: Motorists Face Updated Compliance Rules Nationwide
This collection of beginner yoga stretches helps loosen up areas that commonly feel tight. You will work on your neck and back along with your hips and hamstrings. The key is to move slowly and breathe steadily while staying comfortable. Do not worry about how deep you can stretch. These gentle movements target the muscles that tend to get stiff from sitting too long or daily activities. Each stretch is designed to release tension without pushing your body too hard. Focus on maintaining steady breathing throughout each position. This helps your muscles relax more effectively. Start with your neck by gently rolling it from side to side. Move your head forward and back to release built-up tension. For your back you can try simple twists while sitting or lying down. These movements help improve flexibility in your spine. Hip stretches are especially helpful if you spend most of your day sitting. Simple poses like the butterfly stretch or low lunges open up tight hip flexors. Your hamstrings also benefit from forward bends done at your own pace. Remember that flexibility develops gradually over time. The most important thing is listening to your body. Stretch only to the point where you feel a gentle pull. Pain is a signal to ease back. Hold each position for about 20 to 30 seconds while breathing naturally. Regular practice brings better results than forcing yourself into uncomfortable positions. These basic stretches work well as a morning routine or evening wind-down. They require no special equipment & can be done almost anywhere. With consistent practice you will notice improved flexibility & reduced muscle tension throughout your body.
Slow Neck Circles to Release Daily Tension
Neck Circles What it works:This exercise targets your neck muscles and the upper part of your shoulders.
How to perform it: Move your head in gentle circular motions while breathing steadily throughout the movement.
Why it helps:This stretch releases tightness that builds up from looking at screens and sitting at a desk all day. It also helps your neck move more freely.
Tips for beginners:Make sure you move slowly and stay in control of the motion. Never push your neck beyond what feels comfortable.
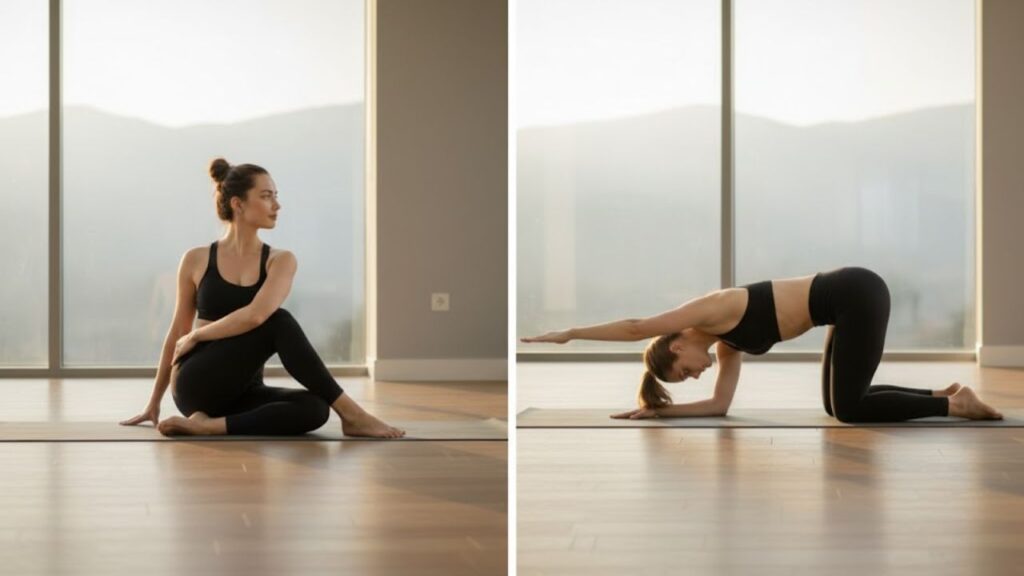
Seated Spinal Twist for a Looser, Healthier Back
# Seated Spinal Twist
**What it works:** This exercise focuses on your spine & also engages your waist and the oblique muscles located on the sides of your body. The seated spinal twist helps improve flexibility in your back while strengthening the muscles that run along your midsection. When you perform this movement you rotate your upper body which activates the obliques that wrap around your sides. These muscles play an important role in twisting motions and maintaining core stability. This stretch is particularly beneficial for people who sit for long periods during the day. It helps release tension that builds up in the spine and surrounding muscles. The twisting motion encourages better mobility in your vertebrae and can reduce stiffness in your lower back. Regular practice of the seated spinal twist can enhance your overall posture and make everyday movements feel easier. The exercise requires minimal space and no equipment which makes it accessible for most people. You can perform it at your desk or on the floor using a yoga mat. The gentle rotation stimulates blood flow to the spinal area and helps maintain the health of the discs between your vertebrae. This movement also massages your internal organs which can support better digestion. Many people find that incorporating this twist into their routine helps them feel more relaxed and centered.
Start by sitting in a position that feels comfortable while keeping your back straight. Turn your upper body slowly to one side but make sure your hips stay pointing forward. Stay in this position for a moment & then rotate back to the center. After that repeat the same movement on the other side.
Why it helps: Regular practice of this twist promotes better spinal mobility & helps reduce stiffness in your back. It gently stretches the muscles surrounding your spine and can provide relief from tension that builds up from sitting for long periods.
Start by putting your hands on your knees or the armrests of your chair to help support yourself while you move. Turn only as much as feels comfortable & do not push yourself too hard or go past the point where it starts to hurt. If you keep practicing regularly your body will naturally become more flexible and you will be able to turn further as time goes on.
Cat–Cow Flow to Wake Up the Spine Gently
Cat-Cow Stretch What It Works: This exercise focuses on your spine and also works your core muscles and shoulders at the same time.
How to Perform It: Start by positioning yourself on your hands and knees on the floor. From this base position you will move between two shapes. First round your back upward like a cat that feels threatened. Then reverse the movement by arching your back and letting your belly drop toward the floor. Continue switching between these two positions in a steady rhythm.
Why It Helps: The cat-cow stretch makes your spine more flexible and mobile. It also helps your body relax and release tension that builds up during the day.
Advice for Beginners: Focus on coordinating your breathing with each movement. Inhale during one position and exhale during the other. Make sure you transition slowly between the two shapes rather than jerking or moving too quickly. This controlled approach helps you get better results and prevents strain.
Child’s Pose for Deep Relaxation and Hip Ease
Child’s Pose What it works: This pose targets your lower back along with your hips and shoulders.
Start by sitting back until your bottom touches your heels. Then extend your arms forward or rest them next to your body.
This pose works well because it helps your body relax deeply & stretches your spine in a gentle way at the same time.
Tip for beginners: Place cushions or a folded blanket under you if you need extra support.
Thread the Needle Stretch to Open Shoulders Safely
# Thread the Needle Stretch
**Targets:** Upper back, shoulders neck
This stretch helps release tension in your upper back and shoulders while gently rotating your spine. It is particularly useful if you spend long hours sitting at a desk or working on a computer.
**How to perform the stretch:**
Start by getting down on your hands & knees in a tabletop position. Make sure your wrists are directly under your shoulders and your knees are under your hips. Keep your spine in a neutral position with your head looking down at the floor. Take your right arm and slide it underneath your left arm with your palm facing up. Continue threading your arm through until your right shoulder and the right side of your head rest comfortably on the floor. Your right ear should be touching the ground. Keep your left hand planted firmly on the floor for support. You can leave it where it is or walk it forward slightly to deepen the stretch. Feel the gentle twist in your upper back and shoulders as you hold this position. Hold the stretch for twenty to thirty seconds while breathing slowly & deeply. Focus on relaxing your muscles with each exhale. You should feel a pleasant stretch across your upper back and shoulder blade area. Slowly release the stretch by sliding your right arm back out from underneath your body. Return to the starting tabletop position and take a moment to notice how your body feels. Repeat the same movement on the opposite side by threading your left arm under your right arm. Hold for the same amount of time & remember to breathe steadily throughout the stretch. This stretch works well as part of a morning routine or as a break during your workday to relieve built-up tension.
How to do it: Start on your hands and knees in a tabletop position. Take one arm and slide it underneath your chest toward the opposite side. Allow your shoulder and the side of your head to gently rest on the floor. Your other hand can stay planted on the ground for support or you can extend it forward. Hold this position while breathing deeply and then switch to the other side.
Benefits: This stretch effectively releases built-up tension in your shoulders and upper back area. It helps improve mobility in your thoracic spine and can reduce stiffness from sitting or poor posture throughout the day.
Beginner tip: If you feel uncomfortable or your shoulder doesn’t reach the floor easily, place a folded pillow or yoga block under your shoulder for extra support. This modification allows you to ease into the stretch without straining.
Seated Butterfly Pose for Flexible Hips and Inner Thighs
Targets: This stretch works your glutes & hips
How to do it: Start by lying flat on your back on a comfortable surface. Bend both knees and keep your feet flat on the ground. Take your right ankle & place it on top of your left knee. Your right knee should point out to the side while your left foot stays planted. You can gently pull your left thigh toward your chest to deepen the stretch. Hold this position for about 30 seconds & then switch sides.
 Centrelink Payment Increase 2026: Updated Pension And Benefit Rates Begin Rolling Out Nationwide
Benefits: This stretch helps reduce tightness in your hips and relieves discomfort in your lower back. It works well if you sit for extended periods during the day or experience stiffness after exercise sessions.
Beginner tip: Make sure to keep your raised foot flexed throughout the stretch. This means pulling your toes back toward your shin. Keeping your foot flexed protects your knee joint from unnecessary strain and helps you get the most out of the stretch without risking injury.
Reclined Figure-Four Stretch for Gentle Hip Mobility
# Targets: This stretch works your glutes & hips
This exercise focuses on the muscles in your buttocks & hip area. When you perform this stretch regularly you can improve flexibility in these important muscle groups. The glutes are among the largest muscles in your body and they play a key role in movement and posture. Your hip muscles work together with your glutes to support daily activities like walking & climbing stairs. By stretching these areas you can reduce tightness and discomfort that builds up from sitting for long periods. This stretch helps maintain healthy range of motion in your lower body. The movement targets both the gluteus maximus and the smaller hip flexor muscles. These muscles often become tight in people who spend much of their day seated at a desk or in a car. Regular stretching can prevent stiffness and may reduce lower back pain that often connects to tight hips. This particular stretch allows you to work on one side at a time so you can focus on areas that feel especially tight. You might notice that one hip feels different from the other which is common. Taking time to stretch both sides evenly helps create better balance in your body. The benefits extend beyond just flexibility. Stretching your glutes and hips can improve your athletic performance & make everyday movements feel easier. Whether you exercise regularly or lead a more sedentary lifestyle this stretch offers valuable benefits for your physical health and comfort.
How to do it: Start by lying flat on your back on a comfortable surface. Bend both knees and keep your feet flat on the ground. Take your right ankle and place it on top of your left knee. Your right knee should point out to the side while your left foot stays planted. You can gently pull your left thigh toward your chest to deepen the stretch. Hold this position for about 30 seconds and then switch sides.
Benefits: This stretch helps reduce tightness in your hips and relieves discomfort in your lower back. It works well if you sit for long periods during the day or feel stiffness after workouts.
Beginner tip: Make sure to keep your raised foot flexed throughout the stretch. This means pulling your toes back toward your shin. Keeping your foot flexed protects your knee joint from unnecessary strain and helps you get the most out of the stretch without risking injury.
Knees-to-Chest Pose to Relax the Lower Back
argets: Hips, inner thighs, lower back
How to do it: Grip the backs of your thighs or your ankles and slowly open your hips outward.
Benefits: This position helps release tightness in your hips and takes pressure off your spine.
Beginner tip: If you cannot reach your feet easily hold behind your knees instead.
Happy Baby Pose for Stress-Free Hip Opening
# Seated Forward Bend
The Seated Forward Bend is a fundamental yoga pose that stretches the entire back of your body. This calming posture helps lengthen your spine and hamstrings while promoting relaxation & mental clarity.
## How to Perform the Pose
Start by sitting on your mat with your legs extended straight in front of you. Keep your feet flexed and your toes pointing toward the ceiling. Sit up tall and engage your core muscles to support your lower back. Take a deep breath in and lift your arms overhead. As you exhale slowly begin to hinge forward from your hips rather than rounding your back. Reach your hands toward your feet or shins depending on your flexibility level. Keep your spine long as you fold forward. Avoid forcing yourself deeper into the stretch. Instead let gravity do the work as you breathe deeply and relax into the position. Hold the pose for five to ten breaths or longer if comfortable.
## Benefits of This Stretch
This forward bend offers numerous physical and mental benefits. It stretches your hamstrings & calves while releasing tension in your lower back. The pose also massages your internal organs which can aid digestion. Regular practice helps improve flexibility in your spine and legs. It calms your nervous system and reduces stress and anxiety. Many people find this pose helpful for relieving mild depression & fatigue.
## Tips for Beginners
If you cannot reach your feet easily you can use a yoga strap around the soles of your feet. You can also bend your knees slightly to make the pose more accessible. Place a folded blanket under your hips if you need extra support. Focus on lengthening your spine rather than touching your toes. The goal is to create space in your body and breathe comfortably. With consistent practice your flexibility will gradually improve over time.
Targets: This pose works your hamstrings calves and spine.
Start by sitting upright with your spine straight and shoulders relaxed. As you begin to fold forward make sure the movement comes from your hips rather than rounding your back. Keep your spine extended & long throughout the entire motion. Allow your torso to move closer to your legs while maintaining that length in your back. Focus on hinging at the hips and keeping your chest open as you lean forward.
This stretch gradually improves the flexibility of your hamstrings. It also produces a soothing effect on your nervous system & helps you feel more relaxed.
Beginner tip: If you’re new to this pose, it’s okay to keep a bend in your knees. Your main focus should be on keeping your spine long rather than trying to fold deeply. This approach protects your back and helps you build flexibility safely.
Seated Forward Fold to Lengthen the Spine Calmly
Standing Forward Bend Targets: Hamstrings back, shoulders
How to do it: Bend forward from your hips while keeping your knees slightly bent. Let your arms hang down naturally without any tension. Your head and neck should be completely relaxed as you fold over.
This pose stretches your entire back from your heels all the way to your neck. It releases physical tension and helps calm your nervous system. Many people notice it reduces their mental stress and anxiety levels.
Beginner tip: Let your body hang heavy and allow gravity to pull you deeper into the stretch. Do not bounce or force yourself down. Instead stay still & breathe steadily.
Clear Signs Your Body Is Ready for Deeper Yoga Poses
After about six to eight weeks of regular practice you might notice that your body is ready for something different. You can hold simple poses without much difficulty. Areas that used to feel tight now move more easily. You practice regularly every week. You pay more attention to how you breathe and position your body. You feel interested rather than nervous about learning new poses. When you reach this point you can try longer practice sessions or beginner flow classes. You can also experiment with small changes to poses you already know. This approach works better than moving directly to advanced yoga.
Creating Lasting Flexibility—One Comfortable Stretch at a Time
Developing flexibility is a gradual process that cannot be hurried. When you stay consistent and patient with your body you will see better results than if you try to force rapid improvement. These fundamental yoga stretches create a strong foundation for improved movement and less tension over time. Keep practicing on a regular basis and understand that every small advancement adds to your overall development. Building flexibility requires dedication to a steady routine rather than attempting dramatic changes overnight. Your body needs time to adapt to new ranges of motion and pushing too hard can lead to setbacks. The stretches covered here provide essential building blocks that support your physical development in meaningful ways. Make them part of your regular schedule and recognize that progress happens through accumulated effort rather than sudden breakthroughs. The key to success with flexibility training lies in maintaining a sustainable approach. Your muscles and connective tissues respond best to gentle and repeated encouragement rather than aggressive forcing. These yoga positions offer practical tools for enhancing how your body moves while decreasing areas of tightness. Stay committed to your practice & appreciate that each session brings you closer to your goals even when changes seem subtle.